Creating a SharePoint site can significantly enhance your organization's collaboration, communication, and productivity. This guide provides a detailed overview of what SharePoint sites are, their benefits, how to create SharePoint sites and customize them, and how to manage permissions and delete sites when necessary.
What is a SharePoint Site?
A SharePoint site is a secure, web-based platform developed by Microsoft that allows organizations to store, organize, share, and access information from any device. It serves as a centralized location for collaboration, offering features like document libraries, lists, and workflows to streamline business processes.
SharePoint sites can be customized to meet specific business needs, integrate with other Microsoft Office tools, and support intranet, extranet, and internet sites.
Whether it's for team collaboration, project management, or document management, SharePoint sites enhance productivity and ensure efficient information sharing within an organization.
Key Features of a SharePoint Site
Document Management
SharePoint allows you to store and manage files with advanced version control, metadata, and compliance features. For example, a marketing team can store all campaign-related documents in one place, track changes, and ensure compliance with company policies.
Collaboration
Team members can collaborate in real-time on documents, projects, and tasks. This is particularly useful for remote teams who need to work together seamlessly regardless of their physical location.
Customization
You can customize the site's layout, appearance, and functionality with web parts, apps, and themes. This ensures that the site meets the unique needs of your organization.
Integration
SharePoint integrates seamlessly with other Microsoft 365 apps such as Outlook, Teams, and OneDrive. This integration allows for a unified work environment where documents and data flow smoothly across applications.
How to Create a SharePoint Site
Creating a SharePoint site involves a few simple steps that can be completed quickly to set up a collaborative space for your team.
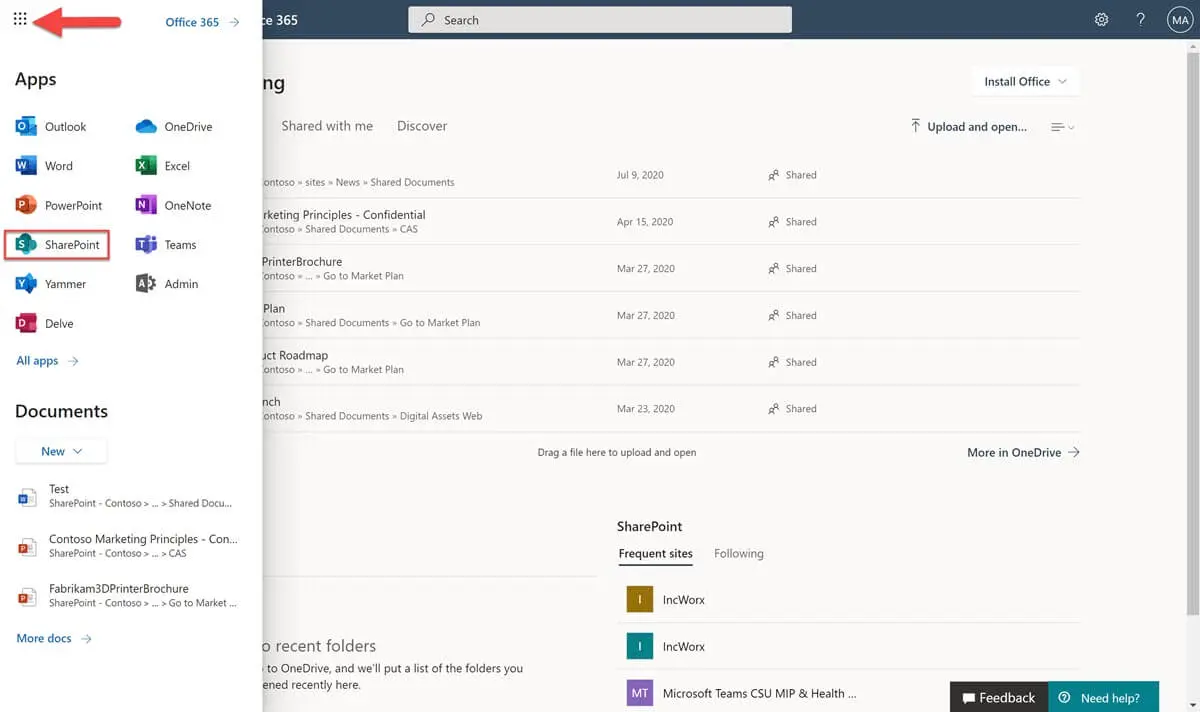
Step 1: Navigate to SharePoint
- Sign in to your Microsoft 365 account: Use your credentials to access your Microsoft 365 account.
- Click on the SharePoint app: In the app launcher, click on the SharePoint app to open the SharePoint home page.
Step 2: Choose a Site Template
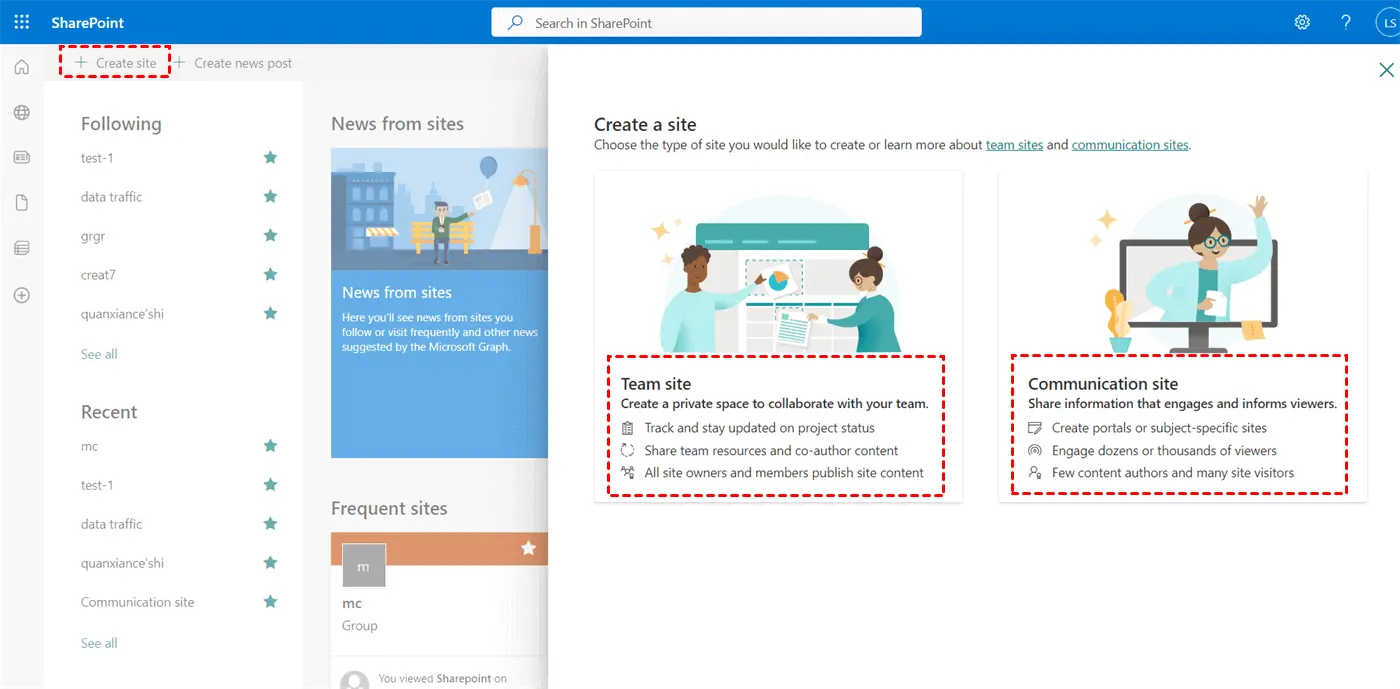
- Select "Create Site": From the SharePoint homepage, click on "Create Site."
- Choose a site template: Select a template based on your needs (e.g., Team Site, Communication Site).
Step 3: Configure Site Settings
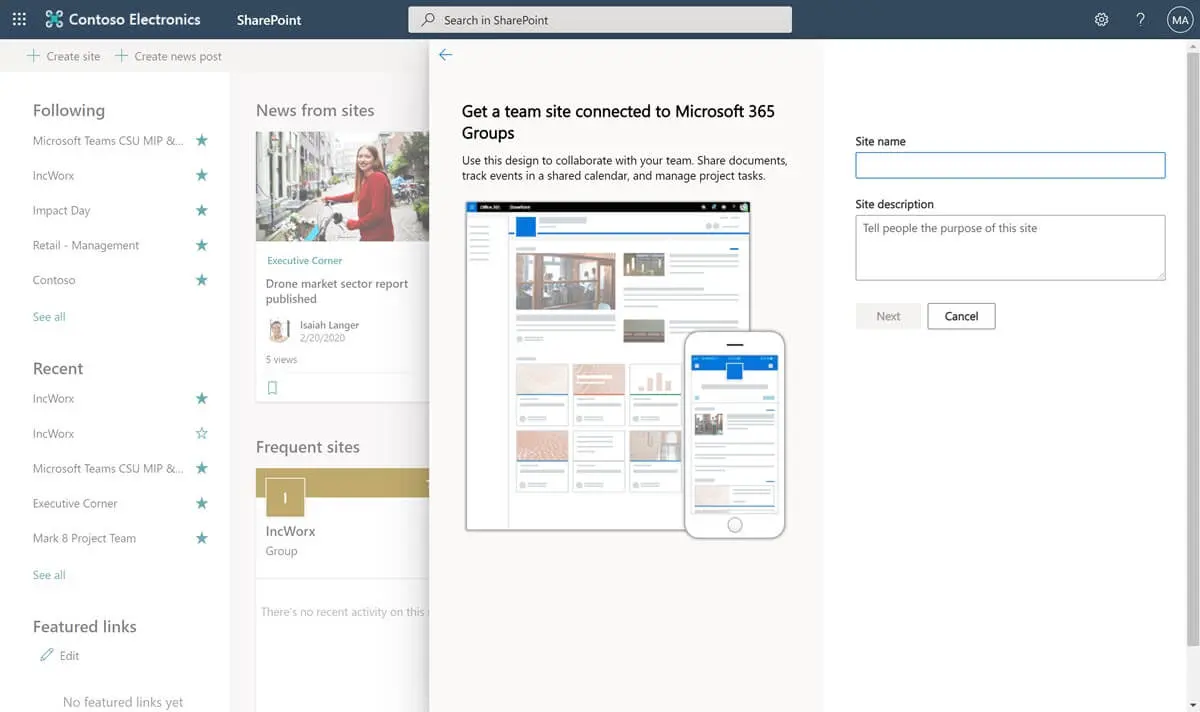
- Enter a site name and description: Provide a name and a brief description of the site.
- Choose a site owner and members: Designate the site owner and invite members.
- Set site permissions and sharing options: Configure who can access the site and what they can do.
Step 4: Customize Your Site
- Add pages, web parts, and apps: Customize your site by adding various elements like pages and web parts.
- Customize the site's appearance and navigation: Modify the look and feel of your site to align with your organization’s branding.
- Configure site settings and features: Adjust settings to optimize site performance and usability.
Benefits of Using SharePoint Sites
Improved Collaboration
SharePoint sites provide centralized document storage with automatic version control, ensuring team members access the latest documents. Real-time co-authoring allows multiple users to work on the same document, streamlining report and presentation creation. Integration with Microsoft 365 apps like Outlook, Teams, and OneDrive simplifies document sharing, making it easier for teams, such as sales, to share materials during meetings.
Enhanced Communication
SharePoint enhances communication by enabling targeted news and updates for specific groups. IT departments can share security updates with all employees. Interactive features like forms and surveys engage employees, helping HR gather feedback or create training content. It also reduces reliance on email by providing a central hub for important information, streamlining corporate communications.
Customizable User Experience
SharePoint allows extensive customization of sites to meet specific organizational needs. Users can create custom site templates, workflows, and dashboards that align with their unique business processes. This personalization improves user engagement and efficiency by providing tailored interfaces and tools.
SharePoint Site Examples
SharePoint offers various site templates to suit different organizational needs. These templates provide a foundation that can be customized to create a site that meets specific requirements.
Team Site
Purpose: Designed for team collaboration on projects, documents, and tasks.
Key Features: Document libraries to store project documents, task lists to track and manage tasks, and calendars to share team schedules. For example, a marketing team can use a team site to manage campaign tasks and schedules.
Use Cases: Project management, departmental collaboration, and team-specific resources.
Communication Site
Purpose: Used to share news, reports, and resources with a larger audience.
Key Features: News web parts to publish articles, event web parts to share upcoming events, and rich multimedia content to engage the audience. For instance, a communication site can be used to keep employees informed about company news and events.
Use Cases: Company-wide announcements, corporate communications, and event promotions.
Hub Site
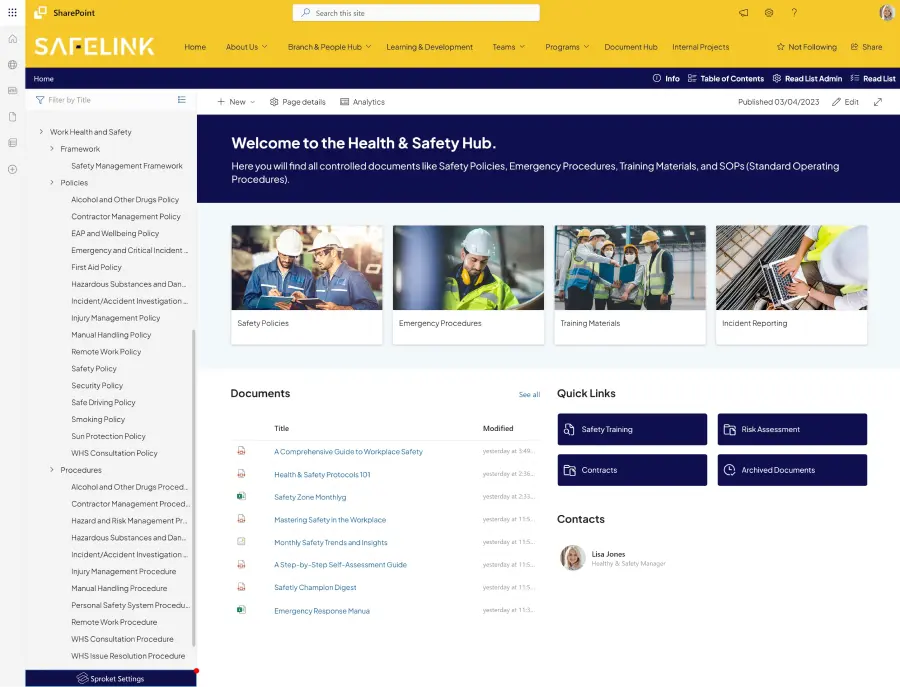
Purpose: Connect and organize related sites for a unified experience.
Key Features: Unified navigation across associated sites, content rollup to aggregate news and events, and shared branding for consistency. For example, a company with multiple departments can use a hub site to provide a unified navigation experience.
Use Cases: Departmental hubs, regional hubs, and project portfolios.
Publishing Site
Purpose: Create and publish web pages for internal or external use.
Key Features: Publishing infrastructure for managing content approval workflows, page layouts for consistency, and rich media management. For instance, a corporate intranet can use a publishing site to share company policies and news.
Use Cases: Corporate intranet, marketing websites, and knowledge bases.
Enterprise Wiki
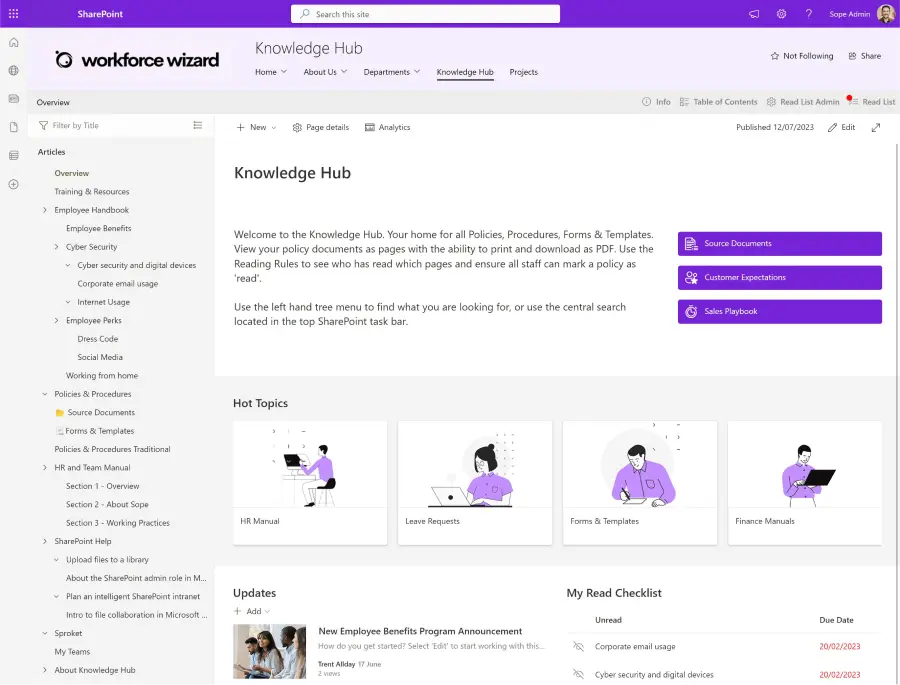
Purpose: Provide a central repository for knowledge and information sharing.
Key Features: Wiki pages for creating and editing content, version history to track changes, and powerful search capabilities. For example, an IT department can use an enterprise wiki to share troubleshooting guides and documentation.
Use Cases: Internal knowledge base, documentation repositories, and training and onboarding materials.
Project Site
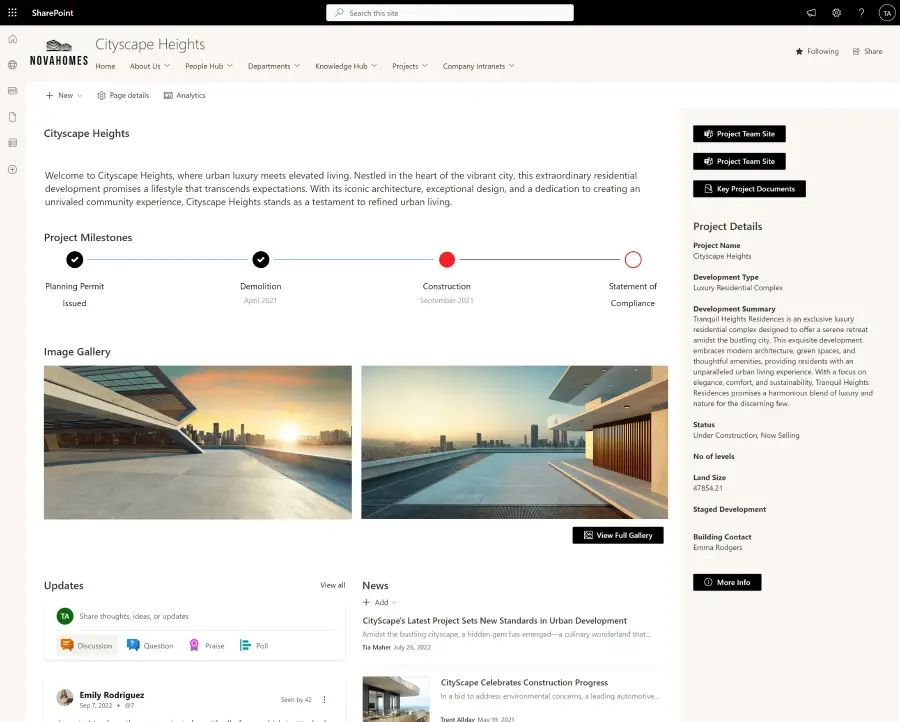
Purpose: Track and manage project tasks, timelines, and documents.
Key Features: Task lists to track project tasks, timeline visualization, and issue tracking. For instance, a project site can be used by a construction team to manage project schedules and documents.
Use Cases: Small to medium-sized projects, task tracking, and project documentation.
Community Site
Purpose: Foster discussions and community engagement.
Key Features: Discussion boards, reputation systems, and moderation tools. For example, a community site can be used to engage employees in discussions about company initiatives.
Use Cases: Employee communities, interest groups, and discussion forums.
Document Center
Purpose: Manage large volumes of documents with advanced features.
Key Features: Document library, metadata and content types, and advanced search capabilities. For instance, a legal department can use a document center to manage legal documents and ensure compliance.
Use Cases: Document-heavy projects, legal document management, and policy and procedure repositories.
Records Center
Purpose: Manage and retain records in compliance with regulatory requirements.
Key Features: Record libraries, retention policies, and audit trails. For example, a financial institution can use a records center to manage and retain financial records.
Use Cases: Legal and regulatory compliance, record retention, and archival of important documents.
SharePoint Site Customization
Customizing your SharePoint site allows you to tailor it to your organization's needs, enhance usability, and create a visually appealing experience.
Customization Options
Apply a Site Theme
Themes allow you to change the overall look and feel of your site, including colors and fonts. To apply a theme, click on the gear icon and select "Change the look." Choose a theme from the available options or customize your own, then click "Save" to apply the changes.
Customize the Site's Navigation
Effective navigation helps users find the content they need quickly. Click on "Edit" in the navigation menu to add, edit, or remove links to suit your site's structure. If using a Hub Site, configure the shared navigation to provide a consistent experience across associated sites.
Add and Configure Web Parts
Web parts are customizable widgets that display content and data on your pages. Edit the page where you want to add a web part, click on the “+” icon, and select the desired web part (e.g., Document Library, News, Events). Customize the settings of each web part to display the appropriate content.
Integrate Third-Party Apps and Services
Enhance functionality by integrating third-party apps from the SharePoint Store. Click on "Settings" and select "Add an app," browse the SharePoint Store for available apps, select and install the desired app, and configure the app settings.
Customizing Pages
Create and Edit Pages
To create a new page, go to the site where you want to add a page, click on "New," and select "Page." To edit an existing page, navigate to the page you want to edit and click on "Edit." Use web parts to add text, images, videos, and other content, and arrange them to create a structured and visually appealing layout.
Advanced Customization
Custom Scripts and Code
For advanced customization, you can add custom scripts and code. Enable custom scripting by navigating to "Settings," selecting "Site Settings," and under "Site Collection Administration," selecting "HTML Field Security." Use the Script Editor web part or embed custom scripts directly into pages, ensuring they are secure and comply with organizational policies.
SharePoint Site Permissions
Managing permissions in SharePoint is crucial to ensuring that the right people have access to the right content. SharePoint offers a flexible permissions model that allows you to control access at various levels.
Permission Levels
SharePoint provides three main permission levels by default:
Owners: Full control over the site, including the ability to manage permissions, create and delete content, and customize site settings. For example, the IT manager might have owner permissions to manage the site.
Members: Can contribute content, such as adding or editing documents and pages, but cannot manage site settings or permissions. For instance, team members working on a project can be given member permissions to collaborate on documents.
Visitors: Read-only access to the site's content, allowing them to view but not modify documents or pages. For example, external stakeholders might be given visitor access to view project updates.
Managing Permissions
Assigning Permissions: To assign permissions, navigate to Site Permissions by clicking on the gear icon in the top-right corner of your SharePoint site and selecting "Site Permissions." You can then add members by entering their email addresses and choosing the appropriate permission level.
Breaking Inheritance: By default, permissions in SharePoint are inherited from the parent site. You can break this inheritance if you need more granular control. Navigate to the specific document library or list where you want to break inheritance, select "Library settings" or "List settings," and then click on "Permissions for this document library" or "Permissions for this list." Select "Stop Inheriting Permissions" and confirm your choice.
Permission Groups: SharePoint allows you to create groups to simplify permission management. Common groups include Site Owners, Site Members, and Site Visitors.
How to Delete a SharePoint Site
Deleting a SharePoint site is a straightforward process, but it is important to proceed with caution as this action is irreversible and will permanently remove all content and data within the site.
Step 1: Navigate to the Site Settings
Access the SharePoint Site: Open the SharePoint site you want to delete.
Open Site Settings: Click on the gear icon (⚙) in the top-right corner of the page and select "Site Information" from the dropdown menu.
Step 2: Delete the Site
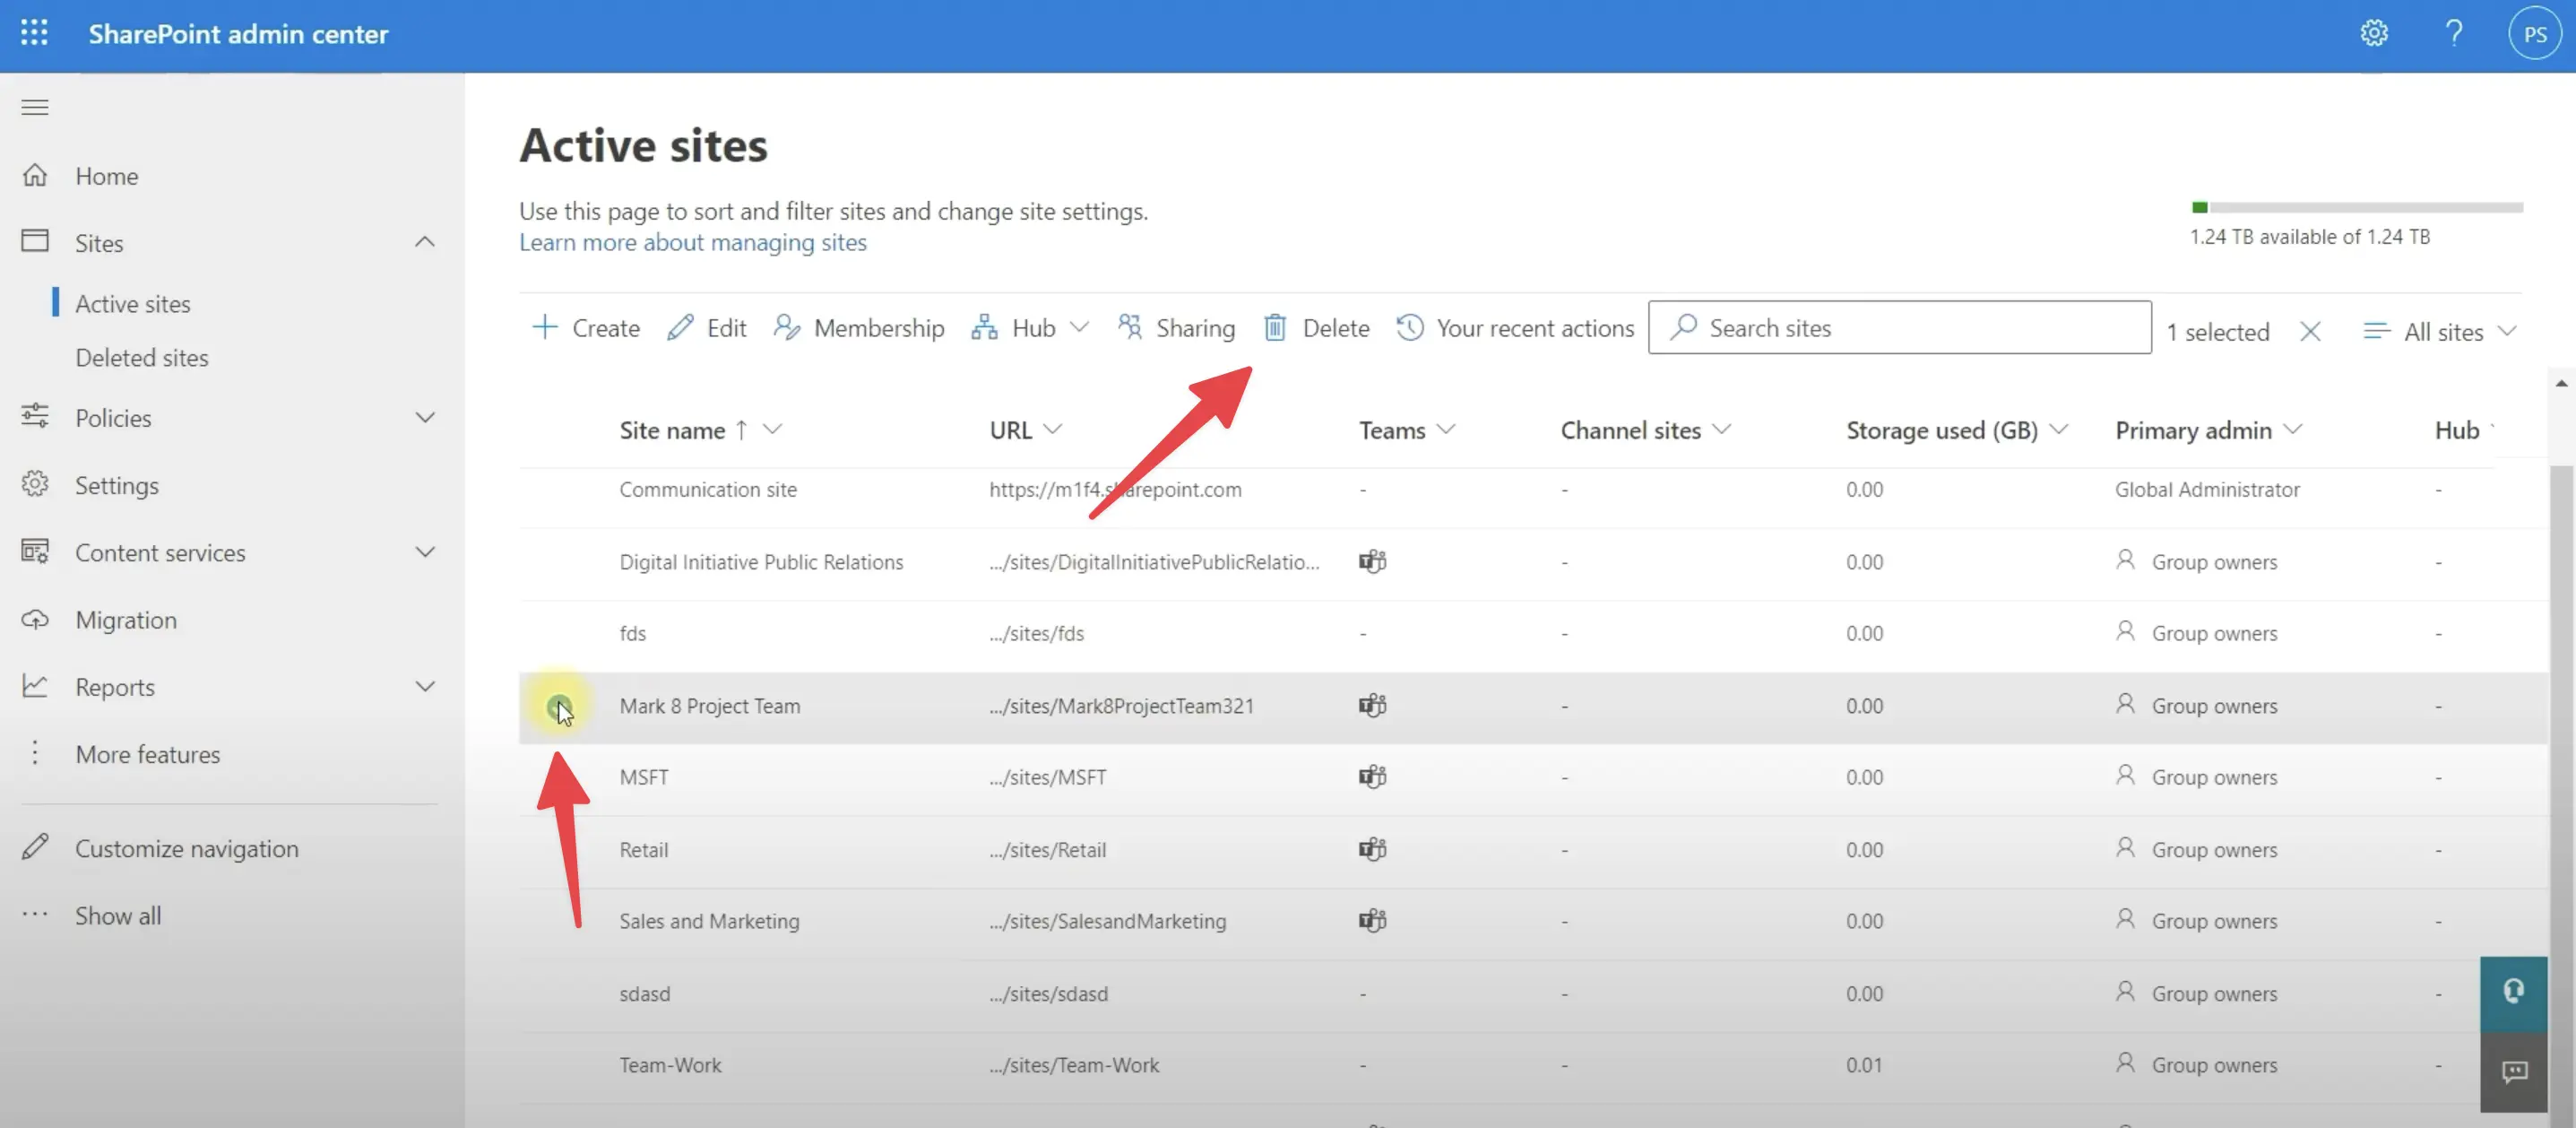
Open Site Information Panel: In the "Site Information" panel, scroll to the bottom.
Delete the Site: Click on the "Delete site" link at the bottom of the panel.
Confirm Deletion: A confirmation dialog will appear asking you to confirm the deletion. Click "Delete" to confirm and permanently delete the site.
Additional Considerations
Backup Important Data: Before deleting a SharePoint site, ensure that you have backed up any important data. Once the site is deleted, all documents, lists, libraries, and other content will be permanently lost.
Check Subsites: If the site you are deleting has subsites, those subsites will also be deleted. Verify whether there are any subsites and ensure they are no longer needed or have been backed up.
%201.svg)


.png)

_1.avif)
%20(27).avif)


%201.svg)

